# Pico Popn - Pop'n Music Controller
 Features:
* It's tiny.
* 1000Hz polling rate.
* HID lights (9 button lights and Logo RGB).
* RGB rainbow effects.
* Light brightness control (v1.2+).
Thanks to:
* SpeedyPotato, for his great SDVX pico project which inspired me in the first place. I also got many materials from his repo. Check out his great projects: https://github.com/speedypotato.
* CrazyRedMachine, I got panel arts from his SVG files: https://github.com/CrazyRedMachine/PopnPanel.
* Many respectful guys/companies who made their tools or materials free or open source (KiCad, OpenSCAD, InkScape, Raspberry things).
## Notes
For builds v1.1 and earlier, you need to do a small modification and the main PCB to get brightness control with latest firmware.
See the bottom of this document.
## My Other Projects
You can check out my other cool projects.


 * Popn Pico: https://github.com/whowechina/popn_pico
* IIDX Pico: https://github.com/whowechina/iidx_pico
* IIDX Teeny: https://github.com/whowechina/iidx_teeny
* Chu Pico: https://github.com/whowechina/chu_pico
* Mai Pico: https://github.com/whowechina/mai_pico
* Diva Pico: https://github.com/whowechina/diva_pico
* AIC Pico: https://github.com/whowechina/aic_pico
* Groove Pico: https://github.com/whowechina/groove_pico
* Geki Pico: https://github.com/whowechina/geki_pico
* Musec Pico: https://github.com/whowechina/musec_pico
## **Disclaimer** ##
I made this project in my personal time with no financial benefit or sponsorship. I will continue to improve the project. I have done my best to ensure that everything is accurate and functional, there's always a chance that mistakes may occur. I cannot be held responsible for any loss of your time or money that may result from using this open source project. Thank you for your understanding.
## About the License
It's CC-NC. So DIY for yourself and for your friend, don't make money from it. And plagiarism that doesn’t even dare to mention the original author is not acceptable. Plase note that pooling orders and group buying for raw materials is acceptable. Selling off any leftover components without profit is also acceptable.
If you're interested in some kind of commercial use, please contact me (Discord, QQ group, Wechat group or leave your contact in issue section).
## My Discord Invitation
https://discord.gg/M8f2PPQFEA
## HOW TO BUILD
### Step 1 - Buy
* Place order at jlcpcb.com for PCB and plate. Gerber zip files are **/PRODUCTION/PCB.zip** and **/PRODUCTION/PLATE.zip**. Leave everything default in JLC's ordering page (board thickness is 1.6mm). Choose what ever color you like, I prefer white.
 * Order 3D printing service for the case, FDM with transparent PETG filament or SLA with half-transparent resin. If you own a 3D printer, do it yourself. The file is **/PRODUCTION/pico_popn_case.stl**.
 * Buy other components (get few more for tolerance):
* 1 * Raspberry Pi Pico (https://www.raspberrypi.com/products/raspberry-pi-pico/)
* 9 * Gateron Hotswap Sockets (https://www.gateron.co/products/gateron-hot-swap-pcb-socket)
* 9 * Gateron 3.4mm-travel switches (I prefer Box CJ Switch, https://www.keychron.com/products/gateron-box-cj-switch)
* 1 * USB Type-C socket (918-418K2023S40001 or KH-TYPE-C-16P)
* 10 * WS2812B-4020 side-facing RGB LEDs
* 9 * 2835 white LEDs (0.2W or 0.5W)
* 10 * 0603 220ohm resistors
* 2 * 0603 5.1kohm resistors
* 2 * Tactile Switches (4.5x4.5x6.5mm or 4.5x4.5x7mm or KAN4542-0701C)
* 4 * set of M3 screws/nuts/spacers (I'll explain later)
* 9 * Keycaps (many choices I'll explain later)
### Step 2 - Solder
* Use the smallest soldering iron tip you have.
* Use solder flux, always keep the pins "wet".
* Soldering iron temperature set to around 300°C.
* Use tweezers to hold components.
* Tricks for Type-C socket and 4020 RGB LEDs.
* Put flux on all those small pins. Melt a tiny little bit solder (seriously very very little bit) at the iron tip. Then quickly solder the pins. Flux and very little bit solder is the key.
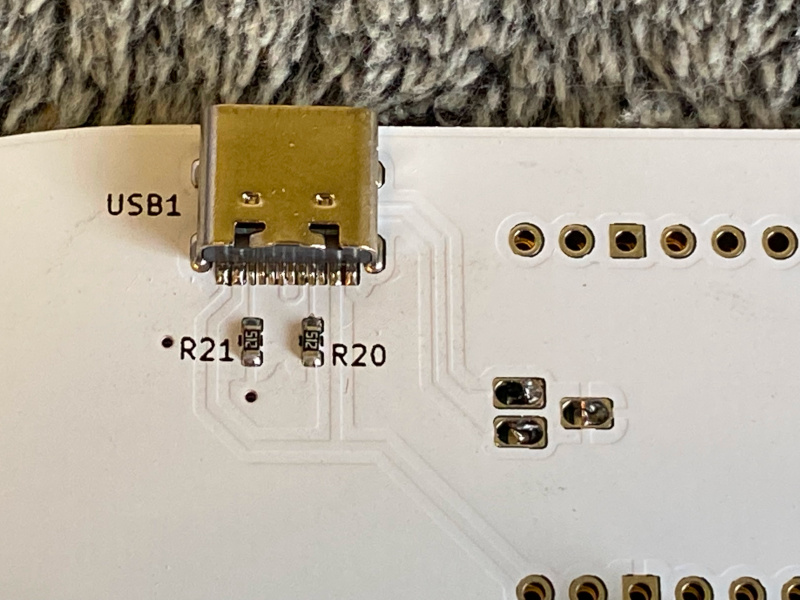
* 2 resistors near USB socket are 5.1k ohm, others are all 220ohm.
* Don't forget to solder 3 "holes" which connects to the Raspberry Pi Pico's USB pins.
 * 4020 RGB LEDs are side-facing, don't make it "up-facing".
 * They look like this when finish:

 ### Step 3 - Firmware
* Use a USB cable to connect the PCB to a PC/Mac computer while pressing down the small button on Raspberry Pi Pico. An explorer window will pop up. If it doesn't show up, navigate to a disk labeled "RPI-RP2".
 * Drag the UF2 file (**/PRODUCTION/pico_popn.uf2**) to the root of this new disk.
* The RGB lights will start rainbow effects.
* If it's not working, go back to Step 2 and fix it.
### Step 4 - Assembly
* Insert 9 key switches into the plate, be careful, don't bend the leads.
 * Put the PCB into the case.
* Gap between the plate and the PCB is about 3.4mm. There're many ways to fix and fasten boards and case. Here's my solution, I reprocessed the screws and spacers as they didn't come with proper length.
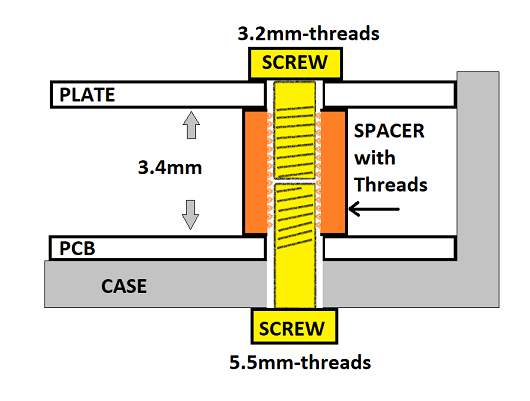
 * Another way is to use a long M3 screw from top side and a nut at the bottom side. Between PCB and plate, use a 3.5mm length M3 spacer with no threads. You can also 3D print some spacers using provided **/PRODUCTION/screw_spacer.stl**.
* Don't forget get some anti-slip silicone pads.
 * Almost done.

 ### Step 5 - Keycaps
* If you have resin printer, you can make them by yourself.
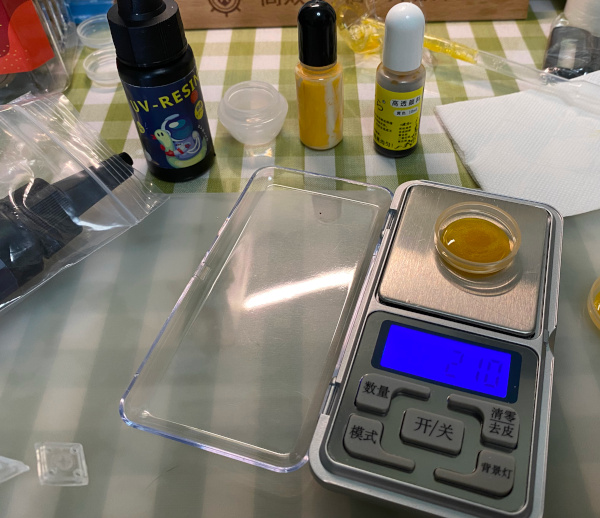
* Make half-transparent resin by mixing translucent and white resin (2:1) as the base resin.
* Mix some drops of UV resin pigment, you can make all Pop'n Music button colors.
 * 3D file is **/PRODUCTION/popn_keycap.stl** or if you're using Chitubox - **/PRODUCTION/popn_keycaps.chitubox**. Orientation and support should be like this to get perfect button surface.
 * These are printed by my Elegoo Mars 3 Pro.
 * There're many other choices.
* Homemade bottle cover keycaps
 * Homemade coat buttons keycaps
 * DSA color keycaps
 * DSA transparent keycaps
 * MA color keycaps
 * XDA 1.5U color keycaps
 * About the homemade process.
* I bought these inexpensive 3gram/5gram distribution bottles just to get the covers (28-30mm diameter).
 * Cut the shaft/socket out of regular transparent keycaps.
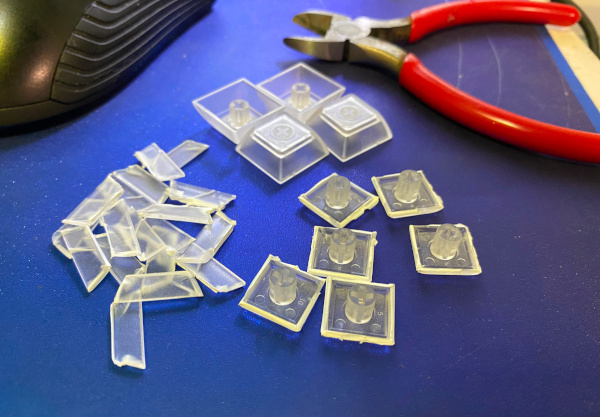 * Drill some holes on them so later we can apply UV resin better.
 * Apply UV resin, glue the socket and the cover together.
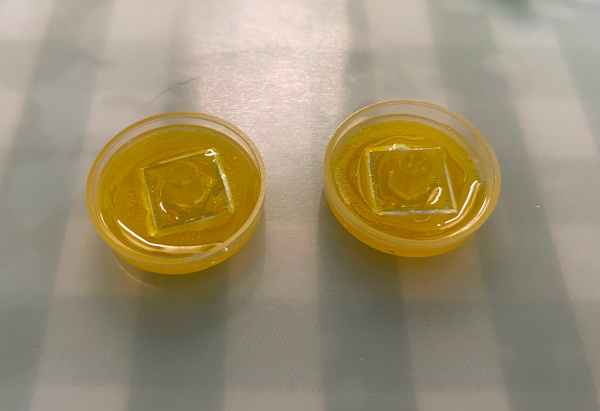 * Don't forget alignment.
 * After cured by UV light, they look like this:
 ## Modification for v1.1 and earlier PCB
In the first version of main PCB (v1.1 and earlier) I chose a wrong GPIO for the button 9 LED which caused a PWM conflict. To support brightness and fading control, that must be fixed.
The idea is to cut the old LED 9 track and wire it to a different pin (GPIO18). The blue * mark in the picture means "to cut the track" and the red * mark means "to solder".
If you don't need brightness and fading control, you don't need make this modification, just use v1.1 firmware.
Sorry for the mistakes I made.


 Features:
* It's tiny.
* 1000Hz polling rate.
* HID lights (9 button lights and Logo RGB).
* RGB rainbow effects.
* Light brightness control (v1.2+).
Thanks to:
* SpeedyPotato, for his great SDVX pico project which inspired me in the first place. I also got many materials from his repo. Check out his great projects: https://github.com/speedypotato.
* CrazyRedMachine, I got panel arts from his SVG files: https://github.com/CrazyRedMachine/PopnPanel.
* Many respectful guys/companies who made their tools or materials free or open source (KiCad, OpenSCAD, InkScape, Raspberry things).
## Notes
For builds v1.1 and earlier, you need to do a small modification and the main PCB to get brightness control with latest firmware.
See the bottom of this document.
## My Other Projects
You can check out my other cool projects.


 * Popn Pico: https://github.com/whowechina/popn_pico
* IIDX Pico: https://github.com/whowechina/iidx_pico
* IIDX Teeny: https://github.com/whowechina/iidx_teeny
* Chu Pico: https://github.com/whowechina/chu_pico
* Mai Pico: https://github.com/whowechina/mai_pico
* Diva Pico: https://github.com/whowechina/diva_pico
* AIC Pico: https://github.com/whowechina/aic_pico
* Groove Pico: https://github.com/whowechina/groove_pico
* Geki Pico: https://github.com/whowechina/geki_pico
* Musec Pico: https://github.com/whowechina/musec_pico
## **Disclaimer** ##
I made this project in my personal time with no financial benefit or sponsorship. I will continue to improve the project. I have done my best to ensure that everything is accurate and functional, there's always a chance that mistakes may occur. I cannot be held responsible for any loss of your time or money that may result from using this open source project. Thank you for your understanding.
## About the License
It's CC-NC. So DIY for yourself and for your friend, don't make money from it. And plagiarism that doesn’t even dare to mention the original author is not acceptable. Plase note that pooling orders and group buying for raw materials is acceptable. Selling off any leftover components without profit is also acceptable.
If you're interested in some kind of commercial use, please contact me (Discord, QQ group, Wechat group or leave your contact in issue section).
## My Discord Invitation
https://discord.gg/M8f2PPQFEA
## HOW TO BUILD
### Step 1 - Buy
* Place order at jlcpcb.com for PCB and plate. Gerber zip files are **/PRODUCTION/PCB.zip** and **/PRODUCTION/PLATE.zip**. Leave everything default in JLC's ordering page (board thickness is 1.6mm). Choose what ever color you like, I prefer white.
 * Order 3D printing service for the case, FDM with transparent PETG filament or SLA with half-transparent resin. If you own a 3D printer, do it yourself. The file is **/PRODUCTION/pico_popn_case.stl**.
 * Buy other components (get few more for tolerance):
* 1 * Raspberry Pi Pico (https://www.raspberrypi.com/products/raspberry-pi-pico/)
* 9 * Gateron Hotswap Sockets (https://www.gateron.co/products/gateron-hot-swap-pcb-socket)
* 9 * Gateron 3.4mm-travel switches (I prefer Box CJ Switch, https://www.keychron.com/products/gateron-box-cj-switch)
* 1 * USB Type-C socket (918-418K2023S40001 or KH-TYPE-C-16P)
* 10 * WS2812B-4020 side-facing RGB LEDs
* 9 * 2835 white LEDs (0.2W or 0.5W)
* 10 * 0603 220ohm resistors
* 2 * 0603 5.1kohm resistors
* 2 * Tactile Switches (4.5x4.5x6.5mm or 4.5x4.5x7mm or KAN4542-0701C)
* 4 * set of M3 screws/nuts/spacers (I'll explain later)
* 9 * Keycaps (many choices I'll explain later)
### Step 2 - Solder
* Use the smallest soldering iron tip you have.
* Use solder flux, always keep the pins "wet".
* Soldering iron temperature set to around 300°C.
* Use tweezers to hold components.
* Tricks for Type-C socket and 4020 RGB LEDs.
* Put flux on all those small pins. Melt a tiny little bit solder (seriously very very little bit) at the iron tip. Then quickly solder the pins. Flux and very little bit solder is the key.
* 2 resistors near USB socket are 5.1k ohm, others are all 220ohm.
* Don't forget to solder 3 "holes" which connects to the Raspberry Pi Pico's USB pins.
 * 4020 RGB LEDs are side-facing, don't make it "up-facing".
 * They look like this when finish:

 ### Step 3 - Firmware
* Use a USB cable to connect the PCB to a PC/Mac computer while pressing down the small button on Raspberry Pi Pico. An explorer window will pop up. If it doesn't show up, navigate to a disk labeled "RPI-RP2".
 * Drag the UF2 file (**/PRODUCTION/pico_popn.uf2**) to the root of this new disk.
* The RGB lights will start rainbow effects.
* If it's not working, go back to Step 2 and fix it.
### Step 4 - Assembly
* Insert 9 key switches into the plate, be careful, don't bend the leads.
 * Put the PCB into the case.
* Gap between the plate and the PCB is about 3.4mm. There're many ways to fix and fasten boards and case. Here's my solution, I reprocessed the screws and spacers as they didn't come with proper length.

 * Another way is to use a long M3 screw from top side and a nut at the bottom side. Between PCB and plate, use a 3.5mm length M3 spacer with no threads. You can also 3D print some spacers using provided **/PRODUCTION/screw_spacer.stl**.
* Don't forget get some anti-slip silicone pads.
 * Almost done.

 ### Step 5 - Keycaps
* If you have resin printer, you can make them by yourself.
* Make half-transparent resin by mixing translucent and white resin (2:1) as the base resin.
* Mix some drops of UV resin pigment, you can make all Pop'n Music button colors.
 * 3D file is **/PRODUCTION/popn_keycap.stl** or if you're using Chitubox - **/PRODUCTION/popn_keycaps.chitubox**. Orientation and support should be like this to get perfect button surface.
 * These are printed by my Elegoo Mars 3 Pro.
 * There're many other choices.
* Homemade bottle cover keycaps
 * Homemade coat buttons keycaps
 * DSA color keycaps
 * DSA transparent keycaps
 * MA color keycaps
 * XDA 1.5U color keycaps
 * About the homemade process.
* I bought these inexpensive 3gram/5gram distribution bottles just to get the covers (28-30mm diameter).
 * Cut the shaft/socket out of regular transparent keycaps.
 * Drill some holes on them so later we can apply UV resin better.
 * Apply UV resin, glue the socket and the cover together.

 * Don't forget alignment.
 * After cured by UV light, they look like this:
 ## Modification for v1.1 and earlier PCB
In the first version of main PCB (v1.1 and earlier) I chose a wrong GPIO for the button 9 LED which caused a PWM conflict. To support brightness and fading control, that must be fixed.
The idea is to cut the old LED 9 track and wire it to a different pin (GPIO18). The blue * mark in the picture means "to cut the track" and the red * mark means "to solder".
If you don't need brightness and fading control, you don't need make this modification, just use v1.1 firmware.
Sorry for the mistakes I made.


