mirror of
https://github.com/whowechina/iidx_pico.git
synced 2025-02-21 04:47:15 +01:00
Pico IIDX - Beatmania IIDX controller


Features:
- It's thin, really thin.
- Turntable and keyboard are separate.
- Magnetic connector.
- 1000Hz polling rate.
- HID lights, of course!
- Multiple turntable effects.
- Many live settings.
Thanks to many respectful guys/companies who made their tools or materials free or open source (KiCad, OpenSCAD, InkScape, Raspberry things).
Caution
This is a difficult build, much more difficult than my previous Pico Popn project:
https://github.com/whowechina/popn_pico.
I suggest you to build the my Pico Popn first.
This Pico IIDX project:
- Heavily depends on 3D printing, both FDM and SLA (resin).
- Requires skills to solder tiny components and thin cables.
Move forward only if you're REALLY interested.
This README documentation is still in progress.
HOW TO BUILD
Turntable Materials
- 1x AS5600 hall angular sensor board set (23mm*23mm)
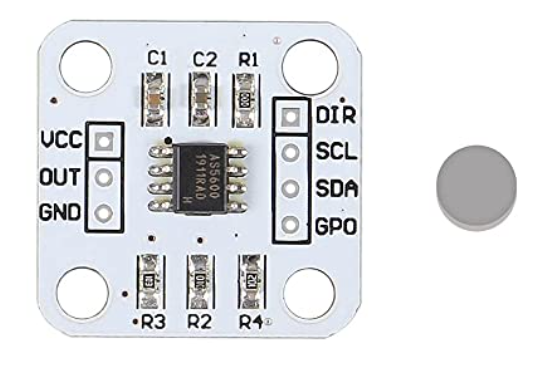
- 1x 6mm*2mm magnet (must be radially magnetized), normally comes with the AS5600 board set.
- 1x 61804-2RS deep groove ball bearing (20x32x7mm), normally < 5US$;
- 3x M4*10mm screws (large flat head is better) and hex nuts.
Keybard Materials
- 1x Raspberry Pi Pico.
https://www.raspberrypi.com/products/raspberry-pi-pico - 11x Kailh Choc v1 or v2 keyswitches, to get better play feel, 7 of them should be 50g linear.
https://www.kailhswitch.com/mechanical-keyboard-switches/low-profile-key-switches/burnt-orange-switch.html
https://www.kailhswitch.com/mechanical-keyboard-switches/key-switches/kailh-low-profile-switch-choc-v2.html - 7x Kailh low-profile stabilizers.
https://chosfox.com/products/kailh-1350-choc-switch-6-25u-stabilizer-set - 2x Panasonic 6mm square tactile switch EVQP1K05M.
https://www3.panasonic.biz/ac/e/dl/catalog/index.jsp?series_cd=3473&part_no=EVQP1K05M - 1x USB Type-C socket (918-418K2023S40001 or KH-TYPE-C-16P)
- 11x WS2812B-3528 RGB LEDs or if you want more challenge: 28x WS2812B-1516.
- 1x 0603 5.1kohm resistors for USB.
- 2x 0603 10ohm resistor.
- 5x 0805 1uF capacitors.
Detachable Cable
- 1x HDMI cable (ultra slim, diameter < 4mm), at least 50cm in length, we'll cut the HDMI connectors off, so pick a cheap one.
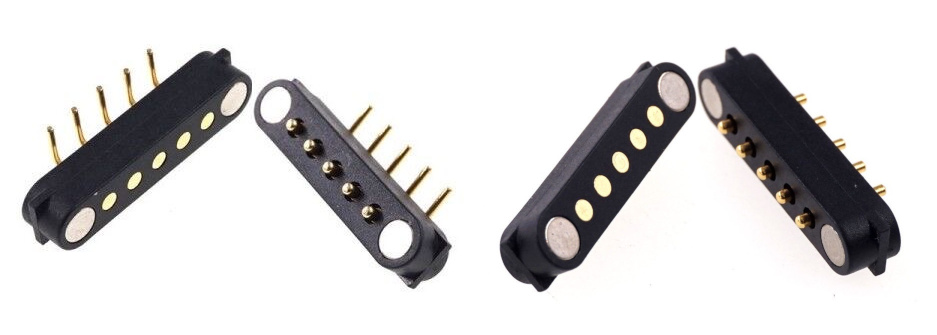
- 2X Magnetic pogopin connector sets, male and female. PCB side should use ones with 90-degree pins, cable side use ones with straight pins.